Total Pageviews

Tuesday, September 13, 2011

Quickie C.R.A.P.

Part of the reason that I haven't been posting so often is because I start one project and then get ideas for a million more.  So, I have a little bit of everything laying around...you know painted deer racks, 60's doggie cookie jar, vintage Kleenex box cover, cabinet doors. You get the point right. 

I thought I'd give a little look at some of the only quickie C.R.A.P that I've completed.


This is a 6x6 gallery wrapped canvas. The front is a piece of scrap paper.  I used a chip board "O" and stamped a print overlay.  On the side, that you can't see well, I used a stencil and modeling paste to give a raised texture.  The modeling paste I used already had a mustard color to it. 


Another 6x6 canvas...actually I got a 4 pack on sale for $14.99.  Not a bad deal.  I used an entire piece of paper to wrap this one, then stamped in 2 different colors. I used blue ink to distress or play up the creases. I cut up a felt coaster that I got out of the $1 bin at Michael's last year.  It's the yellow piece in the bottom left corner.  On top of that, I layered a pendant out the clearance jewelry bin.  Are we sensing a theme here??  I hate full price!  Personally, I feel much more accomplished if I can make $1 bin stuff look good.


Last but not least, a collection of small C.R.A.P.  All three of these are small boxes. The back right was simply painted and then I put a fun sock monkey print on the lid.  The back left is layers upon layers of paper.  We'll call her "Owlina" and she can be" Owliver's" cute lady friend.  The box is my favorite shade of green.  I put one layer of a leaf paper on the lid and cut an owl pattern out of different patterned paper.  The last application consists of small cut out flowers.  I aged the edges of all the cutouts to give them more dimension.  The front item is an eye glass holder.  Another amazing $1 bin find.  It has a flexible veneer top.  All I did to this was spruce it up with paint and some stamping.

The lesson here?? Keep the C.R.A.P. small and maybe I'll finish it in a timely manner.


Monday, September 12, 2011

Orange Mary

Yeah, couldn't think of a good name for this piece of C.R.A.P (Creative Repurposed Awesome Piece). So we'll just call her Orange Mary or Mary Sunrise?? Why do I feel the need to name my C.R.A.P?

 I have this amazing friend, Louschell, and she keeps harassing me about blogging more.  In order to get her to shut up, I am working on it.  You see, she's an avid runner, which you can read about here, and I have let her down in my attempts to be a runner. (I don't run unless something is chasing me)  So, I will have to build her faith in me by being a better blogger.

This piece of C.R.A.P literally evolved out of nothing.  I needed some filler in my shop Peepkeeps.  The box had been hanging around for at least a year and it was covered in some lame scrap paper. I had pulled the paper off and applied some texture and paint a month or so ago, but was still uninspired. UNTIL... a necklace I was wearing broke.


You can't see the texture on the box very well, but it's a stucco finish.  I painted it orange and then used a purple ink to bring out some of the deeper ridges and add shadow.  The gray strands of mica is the necklace that broke, and leaning up against the box is a broken key chain that's been hanging in the junk drawer for a couple of years.


I was originally going to use the strands whole, and wrap them around.  That didn't give the effect I wanted.  I glued the individual mica pieces in random directions, and they ended up looking like rocks or boulders.  So, Mary looks like she's hanging out at the top of a cliff.  Then, I finished it off with some dots of white paint.  I think she needed to be more graphic.  What do you think?

Saturday, August 27, 2011

Owliver's new home

Thank you McKinney Trade Days for a great find!  Of course it had to be on the very last row......120 degrees outside at 11am.... and entirely too heavy to carry all the way back.  Good thing I had a big strong strapping 2 year old that needed to earn his keep.  We loaded this treasure in the stroller and Liam helped push it back to the car. (don't worry, I at least let him see the puppies as a reward).


Isn't she a beauty... well nearly.  I forced my BF ,who my son has named "Aunt Woo" ( imagine an elderly Asian lady), to purchase this piece.  She agreed with the stipulation that I had to fix her up and put her to use.

I spent a week with her and had a million ideas.  For $20 this really is a lifetime addition to Aunt Woo's decor.  I'm hoping that through the years it will end up at my house for a little while.


I think that it may have been in someones backyard. It had a great patina, some cobwebs, a little bit of moss and some rust.

Aunt Woo is a high gloss, mirrored furniture, silver and gold finish kind a girl.  There's no way this little lady would have fit in without having a flashy sophistication about her.  So, she simply got a coat of silver spray paint.


This is less of a how-to and more of ...how do I put it... envision the endless possibilities of one amazing piece.


Here she is setting on the floor in the bedroom.  There's room to hold 2 throw pillows.


Also, I was thinking that it would be perfect for small blankets during the winter.


Here she is set up on the buffet.  May I also introduce you to Owliver?  We looked all over DFW for Owliver.  Once I envisioned him in this cage it was over.  


Owliver is sitting on a mirror that we set in the bottom of the cage (don't forget Aunt Woo has mirrored furniture all through out her home).  It's hard to see but there's a clear beaded garland and a beaded ball.  I also pulled 2 red tapered candles from the other side of the buffet. It turned out beautifully.

If I could even fathom a fire this time of year (remember you could make Smores on your dashboard) I'd also set this next to a fireplace with you know, kindling or wood in it. This really is the most sophisticated piece of C.R.A.P. (Creative Repurposed Awesome Pieces) I've made so far.

Until next time..... Best of luck with your own C.R.A.P.!!!!

Linked up at:


Tuesday, August 16, 2011

GLASS CABINET DOOR INTO WIPE BOARD

I'm attempting to work faster as I have a deadline and need inventory.  In the next couple weeks I will have a space in a local store in downtown McKinney.  This is one of my favorites and pretty easy too.

Picked up a cabinet door with glass and mullions for $5 bucks at the habitat for humanity store.  This is what it looked like before..... well minus the blue painters tape of course.

Took off the hinges and cabinet hardware.  Sanded and spray painted the wood green that was supposed to be high gloss. 

Problem #1 Spray painted outside HOT!!!
Problem #2 70 lb gentle giant jumped directly on top of fresh paint
Problem #3 no more high gloss look

SOLUTION SETTLEMENT: take some sand paper to it and distress it.

Next step, I used some scrapbook paper and put it on the back of the door.  I wanted to have a print that was kind of classic.


I wasn't going to add any hardware, but...... there were already 2 holes drilled for the original handle.  I covered them at first but then found these tiny knobs in my junk drawer.


Here it is up on the wall.  The knobs worked out great for keys and dog leashes.  

HEY YOU!!! DON'T FORGET THE DRY CLEANING!!


Thursday, August 11, 2011

Ukulele repurpose

Does it seem like I start every post with "Finally I finished...."  Well there's a reason.  It takes me forever to finish a project.  Working full time and having a 2 year old running around makes my timeline draaaagggg.

Anyway, my husband brought this ukulele  home from his grandad's house a couple years ago hoping I'd do something with it.  It sat gathering dust until finally I got inspired to do something with it.  A couple months ago I took an old white matte and added strips of scrapbook paper to change it. ( The reason I tell you this will make sense soon)


This is how the matte turned out.... with the most handsome young man. 

So here's ye ole' Eukele.

I used the same strips of paper to the Eukele.  Then added some cutout flowers and aged the edges with ink.  I slapped a clear coat on the entire thing and waited for it to dry. 

I had purchased some decorative knobs that I glued on....and in one case drilled throught the wood to actually install. Then, I had to wait for my husband, the musician, to put strings on it. 

For the life of me, I couldn't get a good picture of the final product.  But, I've got some close ups that might be better.  So, the cabinet knobs are for necklaces to hang on.  On the strings, I hung earrings and magnetic pendants.

It was a bitch to hang and get level but in the end I think it turned out pretty cool.

Tuesday, July 26, 2011

Fly Fly Birdie

Finally, I get to post another project. I'm not going to lie, the 20-something day of over 100 degrees makes me want to be extremely lazy.  The idea of moving an inch causes sweat to dribble down my face.  Not to mention that clothing should be optional when it's 101.

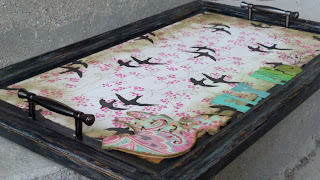
Anyway, I've seen the cabinet door makeover a bunch and decided to try it out for myself.  So, I headed to my new favorite store - Habitat for Humanity Restore.  I love this store and have recently found out that you have to go every week so you don't lose out on some awesome items.  They carry random cabinet doors for $5.00 in all kinds of sizes.  Some raised panel, some glass, but I decided on flat panel with molding.  My theory mainly being that if it was meant to go on coffee table or actually carry drinks into another room the flatter, the better.  Also, if something spilled the molding might keep liquids from going over the edge.

And..... here is the 1970's beauty that came home with me.  Aren't you glad that you don't have these cabinets hanging in your kitchen?

Objective #1 sand this sucker slap a coat of paint on it and then.... wing it.  No pun intended!

I didn't take any during pictures because .... well... I forgot.  So I'll give a description :

Molding - coat black paint, silver crackle over the top of that.
Center panel - awesome wrapping paper purchase in downtown McKinney antique shop
Appliques - bird Christmas ornament and chip board letters

Final Product


I aged the wrapping paper with a ink.  I think on the next one I will crumple the paper to get more cool lines.

Also, I sanded off some of the black finish so that you could see some the wood through it.


The bird was a Christmas ornament that I got out
or the dollar bin at Michael's.  It had a horrible green gingham pattern on it.  I covered it with a patterned scrap book paper.


The chip board letters are painted and don't match at all.


All in all, this was a very simple project to do.  Maybe the hardest was putting on the cabinet pulls as handles (also purchased a the Restore.) I'm horrible with math and alignment.  In fact, I had to go get another set because I drilled the holes to close the molding. That was a bummer.

This piece will go on my coffee table..... whenever I make myself a coffee table that is.  Small steps people, small steps.

Saturday, July 2, 2011

Finally something artsy!!!!!

Congratulations to myself for actually posting something art related on what is supposed to be by art blog.  Sorry, about the baby babble in the last couple posts, but technically that's 90% of my time and art is about 10%.

So, I bragged about his great garage sale find about 3 weeks ago, and I just finished my overhaul. I should have a catchy name for a Karen Rutledge overhaul... like a it was "Rut-hauled" or it just got "Peeped".  (I have a side business called Peeps Keeps)  But, I'll have to get Alecia Taylor to come up with that because she's supposedly good at that kind of thing.

Anywho... a couple of weeks ago I saw this end table at a garage sale in my neighborhood.  I did one of those, "if it's still there when I get back then it's meant to be."  Six hours later I drove by, and it was still there. Yay me!  I was all prepared to haggle for the table thinking they want at least $20 for it.  I was prepared to offer $10.  But, when I asked the lady how much, she said $5.  I practically yelled "I'll take it". Here is my purchase with about 3inches of dust on it.

It's about 24"wx24"d x 30"tall.  I thought it was all wood and could just be sanded and re-stained.  However the molding was some sort of resin, so I went with paint instead.

Drum roll please.................... the finished product is below:

 I stripped it, sanded it (mainly by hand what a pain), painted and the glazed it.  I decided on orange because...well...because it's my favorite color.  Once it was painted I then used a brown glaze to bring out all the detail.

That's a lie.

I used brown glaze it all the crevices because it was easier than making sure the paint was even all the way through.

The turquoise was the kicker. I was going to paint it a different blue color, but then that would mean it would end up staying in my house forever.  And I kinda want to sell it.

All in all, I think it turned out fantastic!!! Projects like this give me confidence and make me push forward.  It makes me want to check out all the garage sales in the area.   So let me know what you think!