Total Pageviews

Tuesday, July 26, 2011

Fly Fly Birdie

Finally, I get to post another project. I'm not going to lie, the 20-something day of over 100 degrees makes me want to be extremely lazy.  The idea of moving an inch causes sweat to dribble down my face.  Not to mention that clothing should be optional when it's 101.

Anyway, I've seen the cabinet door makeover a bunch and decided to try it out for myself.  So, I headed to my new favorite store - Habitat for Humanity Restore.  I love this store and have recently found out that you have to go every week so you don't lose out on some awesome items.  They carry random cabinet doors for $5.00 in all kinds of sizes.  Some raised panel, some glass, but I decided on flat panel with molding.  My theory mainly being that if it was meant to go on coffee table or actually carry drinks into another room the flatter, the better.  Also, if something spilled the molding might keep liquids from going over the edge.

And..... here is the 1970's beauty that came home with me.  Aren't you glad that you don't have these cabinets hanging in your kitchen?

Objective #1 sand this sucker slap a coat of paint on it and then.... wing it.  No pun intended!

I didn't take any during pictures because .... well... I forgot.  So I'll give a description :

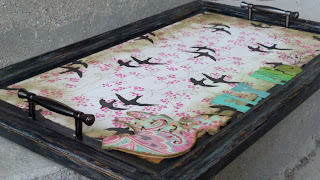
Molding - coat black paint, silver crackle over the top of that.
Center panel - awesome wrapping paper purchase in downtown McKinney antique shop
Appliques - bird Christmas ornament and chip board letters

Final Product


I aged the wrapping paper with a ink.  I think on the next one I will crumple the paper to get more cool lines.

Also, I sanded off some of the black finish so that you could see some the wood through it.


The bird was a Christmas ornament that I got out
or the dollar bin at Michael's.  It had a horrible green gingham pattern on it.  I covered it with a patterned scrap book paper.


The chip board letters are painted and don't match at all.


All in all, this was a very simple project to do.  Maybe the hardest was putting on the cabinet pulls as handles (also purchased a the Restore.) I'm horrible with math and alignment.  In fact, I had to go get another set because I drilled the holes to close the molding. That was a bummer.

This piece will go on my coffee table..... whenever I make myself a coffee table that is.  Small steps people, small steps.

Saturday, July 2, 2011

Finally something artsy!!!!!

Congratulations to myself for actually posting something art related on what is supposed to be by art blog.  Sorry, about the baby babble in the last couple posts, but technically that's 90% of my time and art is about 10%.

So, I bragged about his great garage sale find about 3 weeks ago, and I just finished my overhaul. I should have a catchy name for a Karen Rutledge overhaul... like a it was "Rut-hauled" or it just got "Peeped".  (I have a side business called Peeps Keeps)  But, I'll have to get Alecia Taylor to come up with that because she's supposedly good at that kind of thing.

Anywho... a couple of weeks ago I saw this end table at a garage sale in my neighborhood.  I did one of those, "if it's still there when I get back then it's meant to be."  Six hours later I drove by, and it was still there. Yay me!  I was all prepared to haggle for the table thinking they want at least $20 for it.  I was prepared to offer $10.  But, when I asked the lady how much, she said $5.  I practically yelled "I'll take it". Here is my purchase with about 3inches of dust on it.

It's about 24"wx24"d x 30"tall.  I thought it was all wood and could just be sanded and re-stained.  However the molding was some sort of resin, so I went with paint instead.

Drum roll please.................... the finished product is below:

 I stripped it, sanded it (mainly by hand what a pain), painted and the glazed it.  I decided on orange because...well...because it's my favorite color.  Once it was painted I then used a brown glaze to bring out all the detail.

That's a lie.

I used brown glaze it all the crevices because it was easier than making sure the paint was even all the way through.

The turquoise was the kicker. I was going to paint it a different blue color, but then that would mean it would end up staying in my house forever.  And I kinda want to sell it.

All in all, I think it turned out fantastic!!! Projects like this give me confidence and make me push forward.  It makes me want to check out all the garage sales in the area.   So let me know what you think!